Pages

26 December 2013

Configure Epson 4490 Perfection Photo in Ubuntu 13 10 with Iscan for Linux


This video shows how to install an Epson Perfection 4490 series photo scanner in Ubuntu 13.10.  You can get your scanner up and running on Linux!

Step 1 ) We use lsub command to list the USB devices.  From that, we see the vendor ID of 0x4B8 and the product ID of 0119.  We will ensure these are set in the sane.d configuration files.
Step 2 ) We will add our account to the scanner group using usermod -a -G scanner $LOGNAMENote that it should work without this step.
Step 3 ) We will edit the /etc/sane.d/epson* configuration files to ensure the device ID, product ID, and USB devices are activated.
Step 4) We must logout and log back in for the new group ID change in step 2 to take effect.
Step 5) We go the Epson download website to get the image scan software.  We can find the link in the Ubuntu scanner community site.
Step 6) The Epson Image Scan software requires package xsltproc, so we add that with sudo apt-get install xsltproc.
Step 7) In step 7, we tried to run the Image Scan software and got the dreaded "Could not send command to scanner" error that is oft searched for on the forums.  We fix that by disconnecting the USB cable and plugging it back in. This is done virtually in the video since I used VMWare Player, but you can just unplug the cable.

21 November 2013

OpenBSD 5.4 Full Disk Encryption Installation

The OpenBSD team made full disk encryption during installation easy as apple pie.  Follow the video below.


Description of Video Steps


1. Boot the install CD.  This might be the easiest step
2. Initialize the disk with fdisk -i wd0, which assumes you are using wd0 as your main disk.
3. Add OpenBSD disk label with disklabel -E wd0.
4. Ensure FS Type is set to RAID.
5. We'll create the encrypted volume with bioctl -c C -l /dev/wd0a softraid0 using partition a which is set to RAID and of course we'll enter a strong password when prompted.
6. The softraid volume is assigned its own name sd0 which will be used later.
7. Exit shell to return to the installer.
8. Now enter the softraid volume name sd0 in the root disk question field.

Install Using Desired Settings


9. Eject the CD after set installation and reboot.
10. Enter your secure passphrase from step 5.

Post Install Validation Steps


Let's look at our handiwork and ensure things look well.

11. A close examination reveals the swap is located on the softraid sd0b volume.  This means that the swap is encrypted twice which can be remedied but hasn't been so for this demo.  OpenBSD handles the swap private key.  You can do the install by moving the swap out of the softraid volume or by turning swap encryption off via sysctl which would leave the swap volume encrypted with the same passphrase as the entire softraid volume.

12. Good news! We are using the softraid volume sd0 for everything.

13. A little peek shows different major and minor numbers between the softraid volume sd0 and the physical drive wd0.

14. Now we'll use the install CD to see if we are really encrypted.

15. Note that wd0c has the boot code.  Most of it is binary but you can see the string data such as "...floppy or old BIOS..." and other text.

16. If you press spacebar and scroll for some time, you will find the encrypted block and no hint at all of your OpenBSD data in plaintext.

For the sake of a speedy demo, all default options were taken unless noted above.  Enjoy.


Enhanced by Zemanta

13 March 2013

Chromebook X-Windows Setup Using Crouton

The popular Crouton script, which enables you to run Ubuntu Linux alongside Chrome OS can be used simply to run secure shell (SSH) and X Windows and this can all be done without the virtual display switching keystrokes CTRL-ALT-F3.  I tried the script and really didn't want a second environment to switch to and from.  Considering that Chrome OS uses Linux and X Windows, I should be able to display X Windows on the same display as the Chrome browser.  This is possible and easy to do but you will find issues along the way.  Getting an X Window application displayed alongside the Chrome browser is possible as seen below.
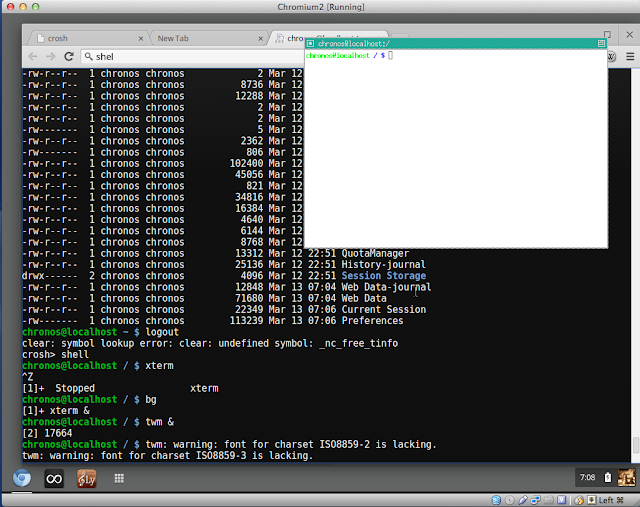
xterm displayed with Chrome browser
Chrome OS Running Xterm and Twm

Follow the instructions to install Crouton on your Chromebook.  I am using Hexxeh's build in a virtual machine.  Add Tom's Window Manager (twm) window manager since the Chrome OS window manager won't manage X Window applications other than the Chrome browser itself.  Then you'll need to set the PATH and LD_LIBRARY_PATH variables to point to the libraries needed for twm and xterm.  You can view my bash_profile changes here.  Note that I named my chroot crouton not precise, so you will have to use the right name for you in the variables and also note that the chroot environment is not encrypted.

This setup is only so I can use SSH and X Windows to remote machines.  Many other applications are expecting config files in /etc which would use the Chrome OS /etc which doesn't support them.  It is possible to compile the binaries so they use /usr/local, like other operating systems do, but I just needed those two functions without switching windows to a whole new environment. It is possible that someone might make a project to use the native non-chroot environment, but that would require making packages just for native usage and why bother when you can piggy back off of the work done for Ubuntu?
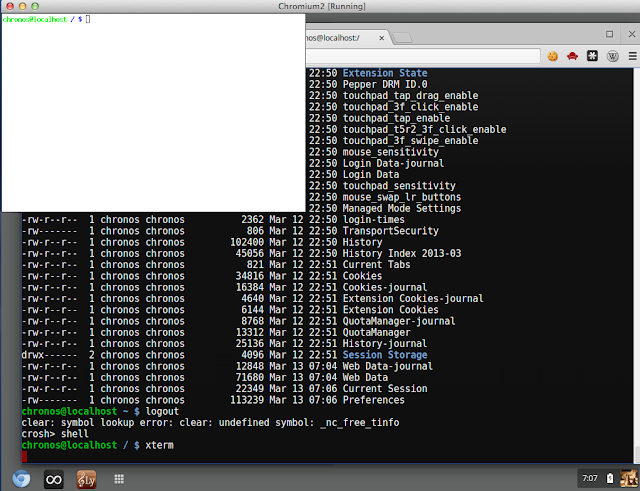
Xterm Window without X Window Manager
Unmanged xterm on Chrome OS

The picture above show the xterm session isn't attached to a window manager.  I ran 'twm &' so the X Windows applications could be managed. They can be minimized, maximized, and moved around with ease.  Note that with two window managers running, I don't get twm menus but that is okay since I only want basic X window and SSH functionality.
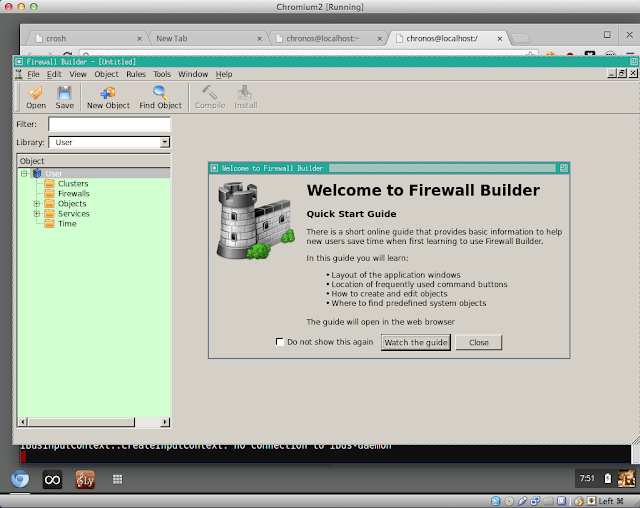
Remote X Window Application In ChromeOS
Firewall Builder Displayed in Chrome OS

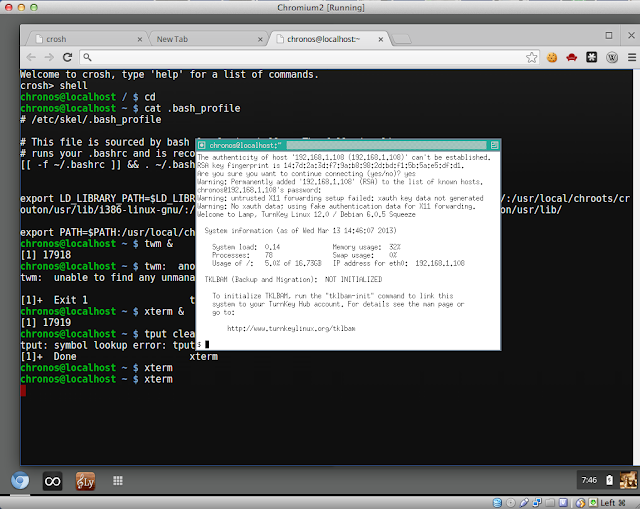
You can also run ssh remotely and bring up windows from other servers, which is what I was hoping to do.  To do that, note that there are no magic cookies (i.e. no .Xauthority file) so SSH will refuse to work.  I just cheated and issued an "xhost +" to enable access.  You can see Firewall Builder up and running from the remote server but it is not possible to tell that it is was started remotely so you'll have to take my word for it.

Here are some important in-between steps captioned to explain what they are for.
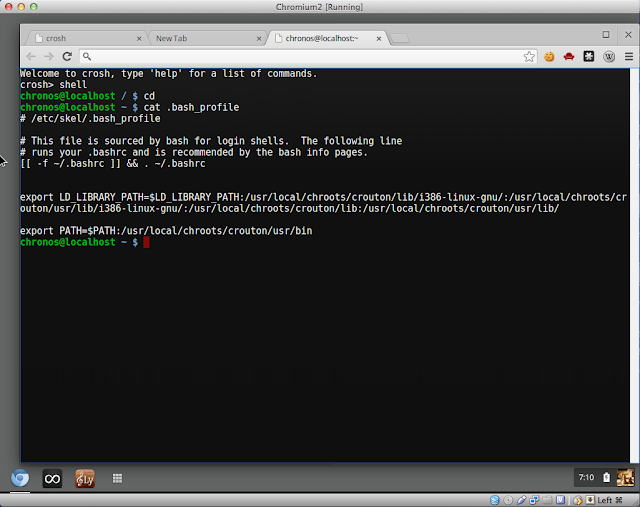
Example bash profile settings for PATH and Library PATH
PATH and LD_LIBRARY_PATH settings for Chrome OS

Running twm alongside another window manager
Start twm and xterm in Chrome OS

What isn't depicted, is the "sudo apt-get install twm" command done while in the chroot environment.  Twm is made available in /usr/bin from the apt instaalation.  So, you must have entered the chroot before running the install command for twm.

Acquiring a cheap Chromebook to run Linux on is a popular idea.  But I already have three other physical machines with Ubuntu, so I don't need another one.  I wanted a lightweight device to do remote work into my other Ubuntu machines and enabling X Windows applications to display on Chrome OS was enough for me but your mileage and needs may vary.